Update: This tutorial is for crocheting right-handed, I now also have a tutorial for crocheting left-handed.
What is a Magic Ring?
A Magic Ring is a great way to to begin a crochet project that will be worked in the round. This technique is excellent for amigurumi. It is also called an Adjustable Ring, Magic Loop, Magic Circle, and Make Circle.
When can a Magic Ring be used?
It can be used on any project that is worked in rounds. It works for both crocheting in a continuous spiral and in joined rounds. Use it instead of “Ch 2, x sc in 2nd ch from hook” in patterns.
Why should I use a Magic Ring?
It’s easy and it looks good! One of the biggest benefits of using a Magic Ring is that there is no hole in the beginning of your work. The following photo shows the difference between “Ch 2, 6 sc in 2nd ch from hook” and 6 sc into a Magic Ring.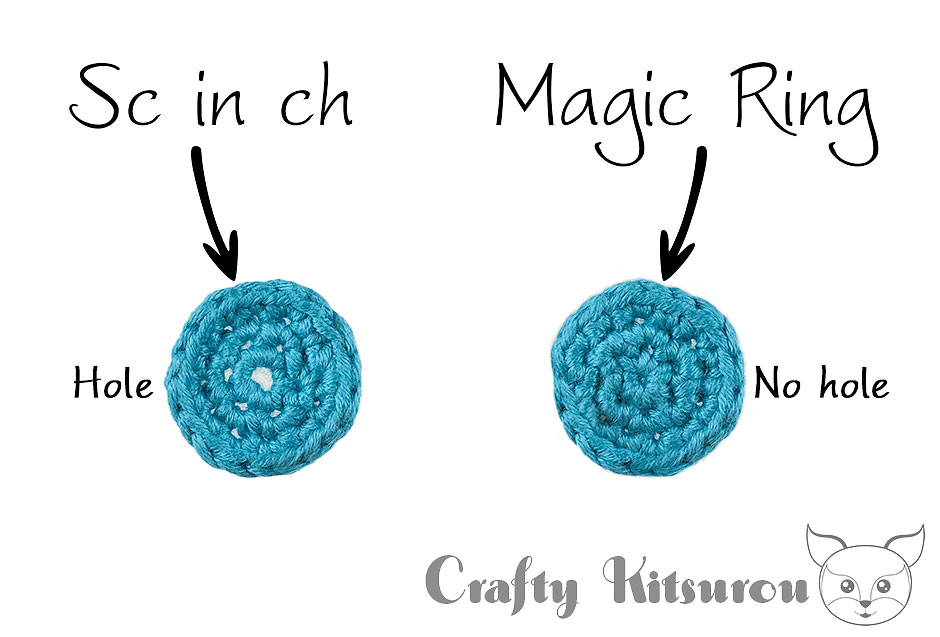
Doesn’t that look nice? The lack of hole makes the Magic Ring a great choice for amigurumi.
Can a Magic Ring only be used with single crochet stitches?
Nope. Single crochet (sc), half-double crochet (hdc), double crochet (dc), triple crochet (tr), and more, can all be used with a Magic Ring.
So, how do I make a Magic Ring?
Follow the instructions and pictures below. If you have any questions about this tutorial, please submit your question in the comment section at the end of this tutorial or email me at help@craftykitsurou.com
How to Crochet a Magic Ring
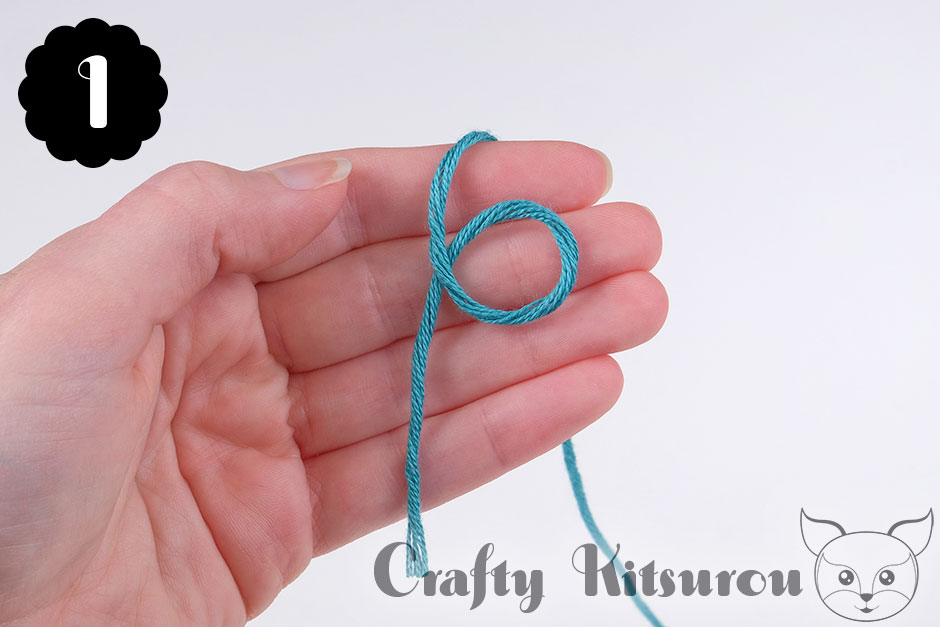
1. Loop yarn around with working yarn on top.
Alternatively, you could loop yarn around your fingers to start.
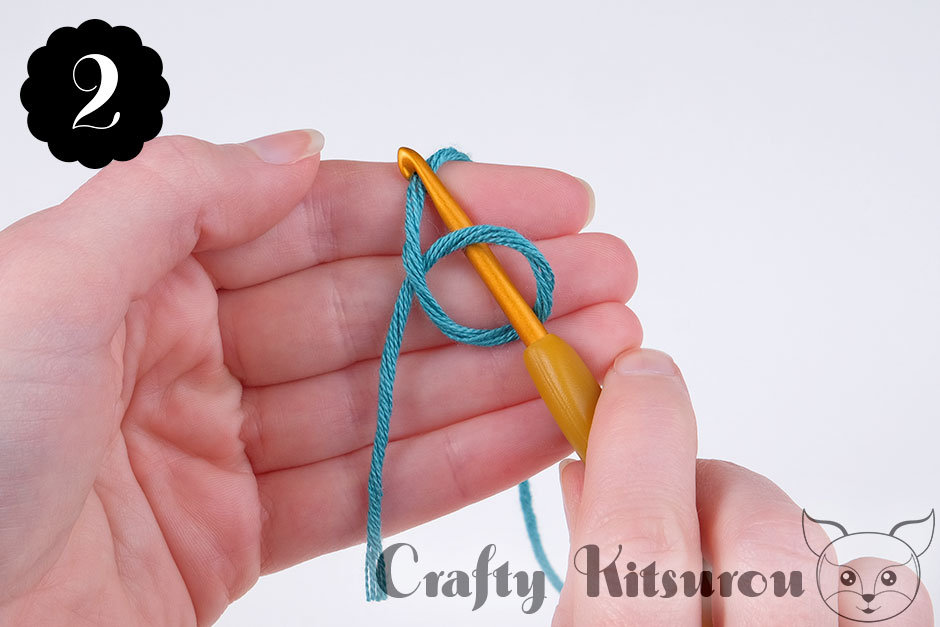
2. Insert crochet hook into loop. Hook working yarn…
I usually hold onto where the yarn crosses with my thumb like I am in picture 3, but I am not doing so in pictures 2 and 4 so you can better see what is going on.
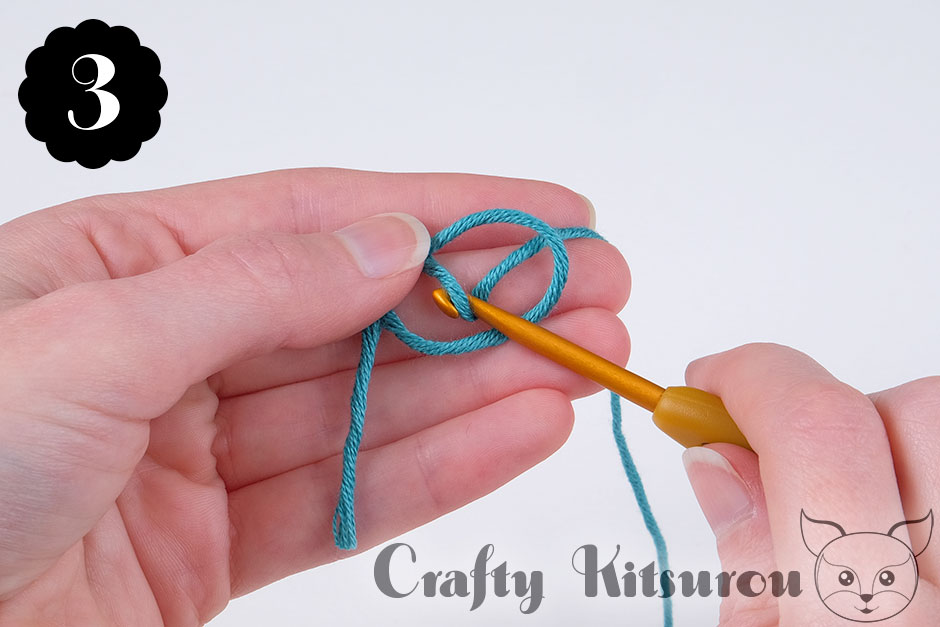 3. …pull working yarn through loop…
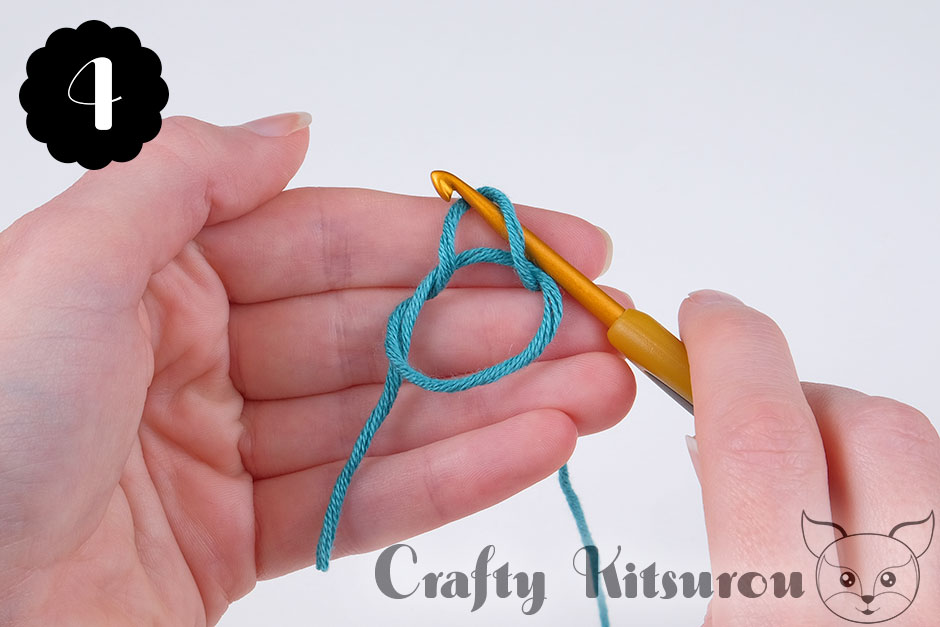 4. …and pull yarn up. You now have 1 loop on hook.
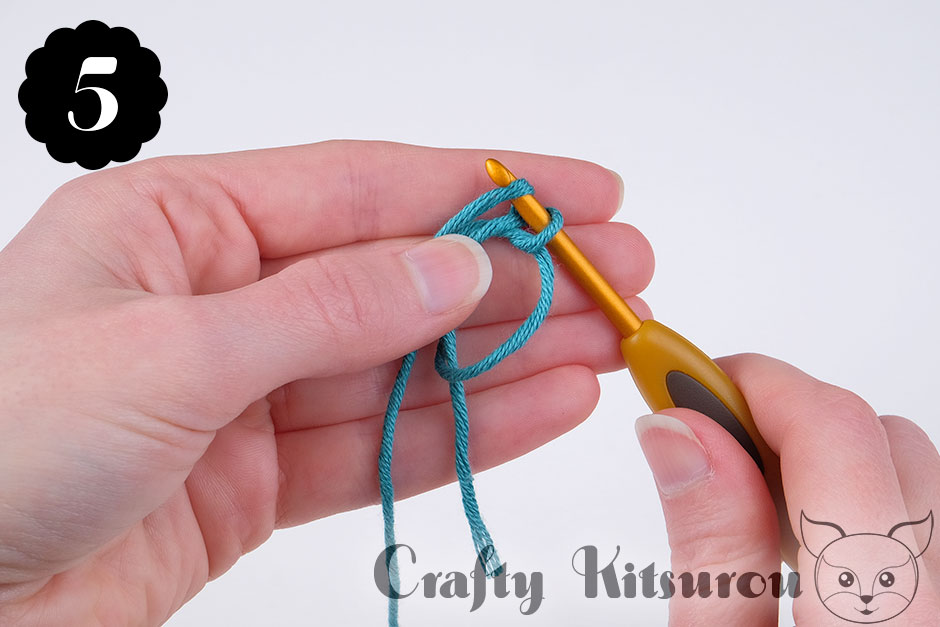 5. Yarn over and pull through loop on hook to chain 1.
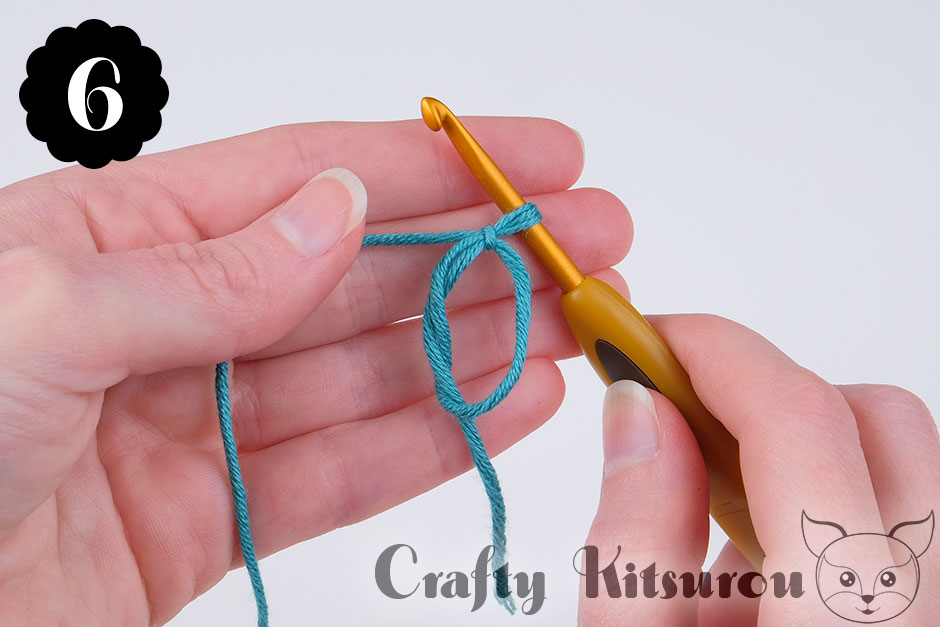 6. This counts as ch 1, not a sc. You are now ready to crochet into ring.
In this tutorial, I am crocheting 6 single crochet stitches into the Magic Ring. It is often written as “6 sc into a Magic Ring”. Many patterns worked in the round start with 6 stitches, but not all. Crochet as many stitches as the pattern states to do.
Other stitches:
Half-Double Crochet – Start crocheting hdc into ring the same as you would sc. I know what you are thinking, “Aren’t you supposed to ch 2 when starting hdc?”. In rows, yes. For rounds, I prefer only 1 ch. It is a preference, you can do either.
Double Crochet – Ch 2 more times, you have now made 3 chains and this will count as your first dc stitch. Begin crocheting dc into ring
Triple Crochet – Ch 3 more times, you have now made 4 chains and this will count as your first tr stitch. Begin crocheting tr into ring.
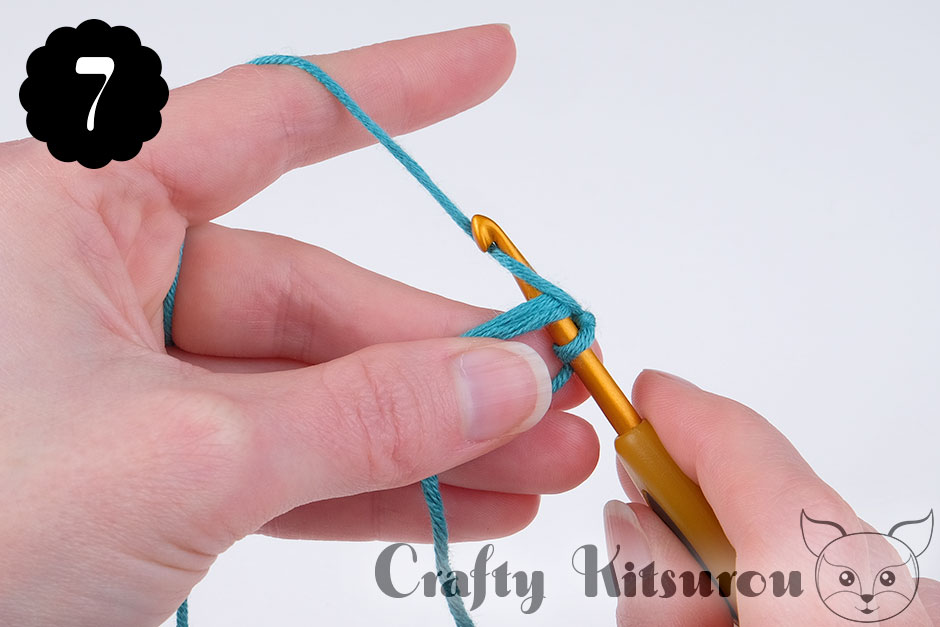 7. Insert hook into ring, yarn over and pull through ring.
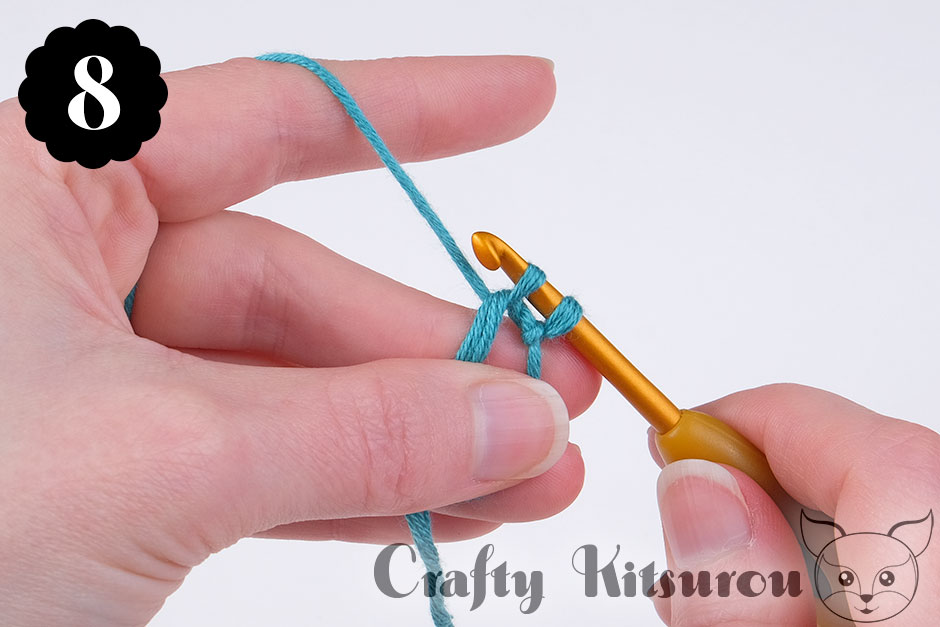 8. You now have 2 loops on hook.
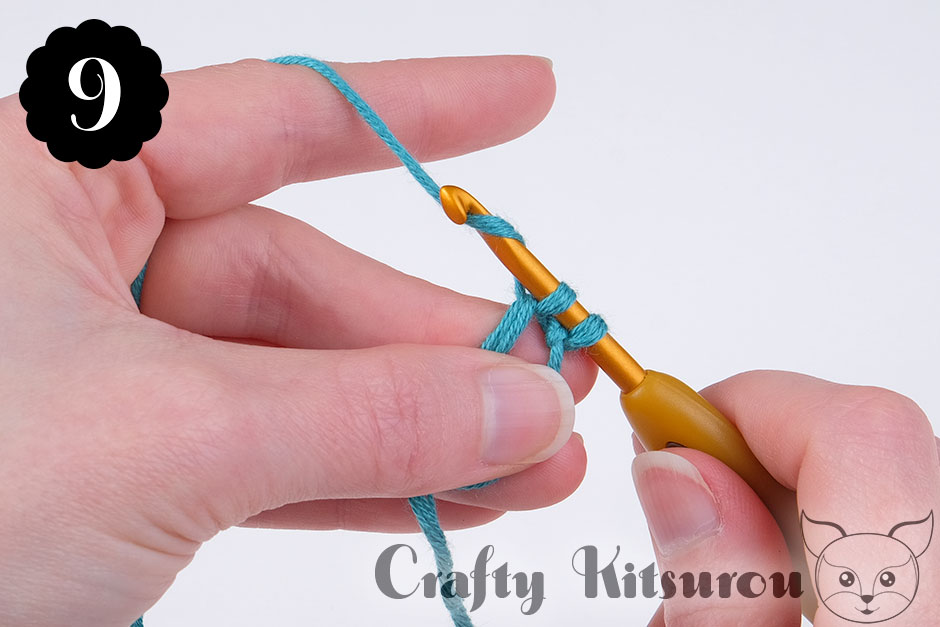 9. Yarn over and pull through both loops.
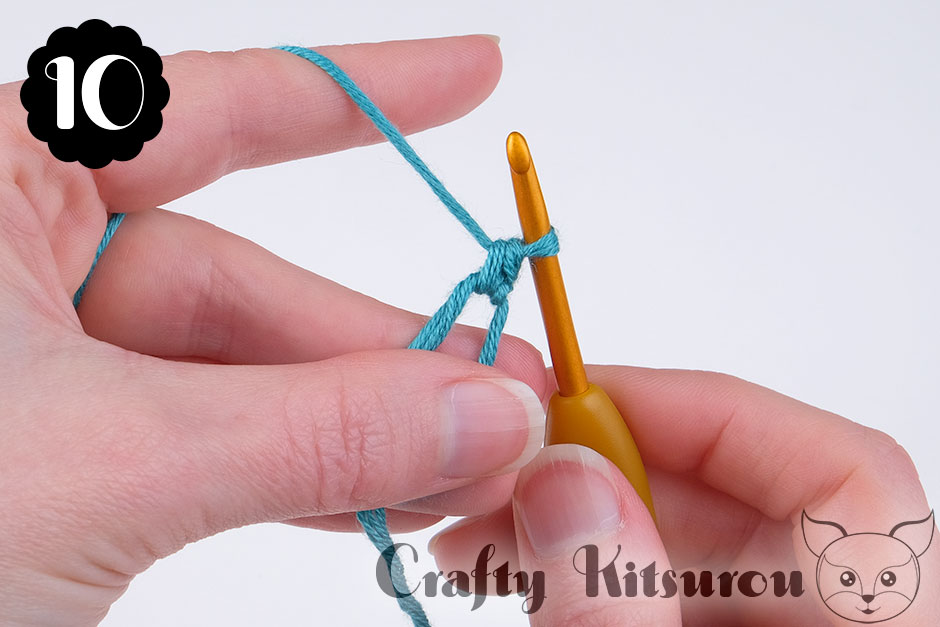 10. You now have 1 sc in your ring. Continue until you have the number of stitches needed for pattern.
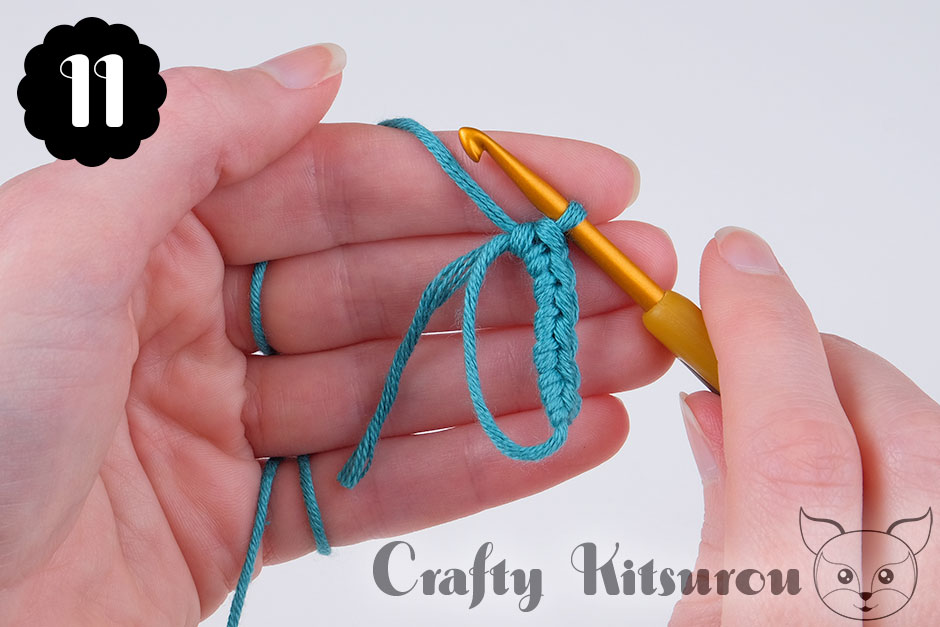 11. Once you have completed all your stitches, you’ll pick up the yarn tail with your hand…
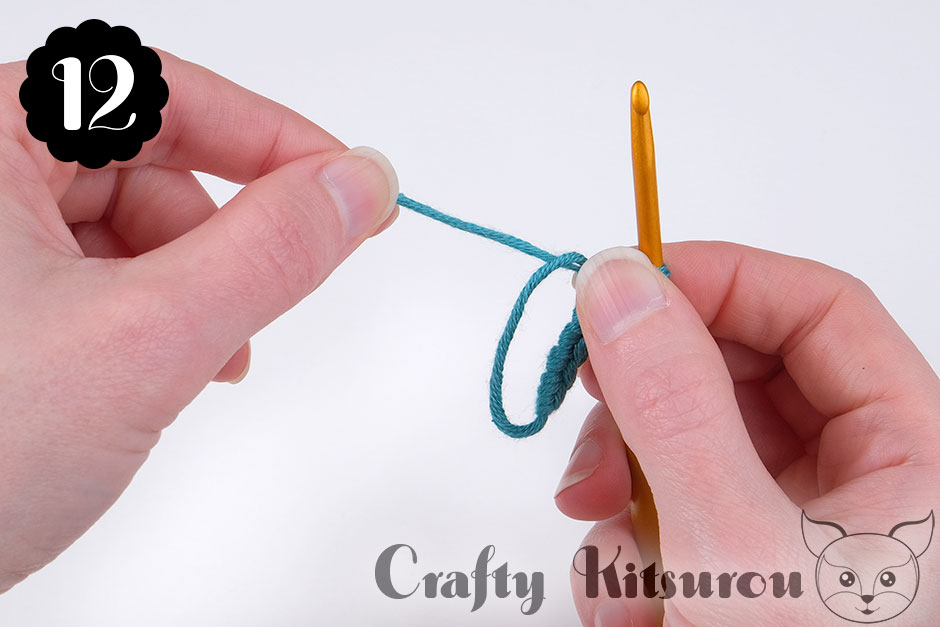 12. …and pull until the ring closes.
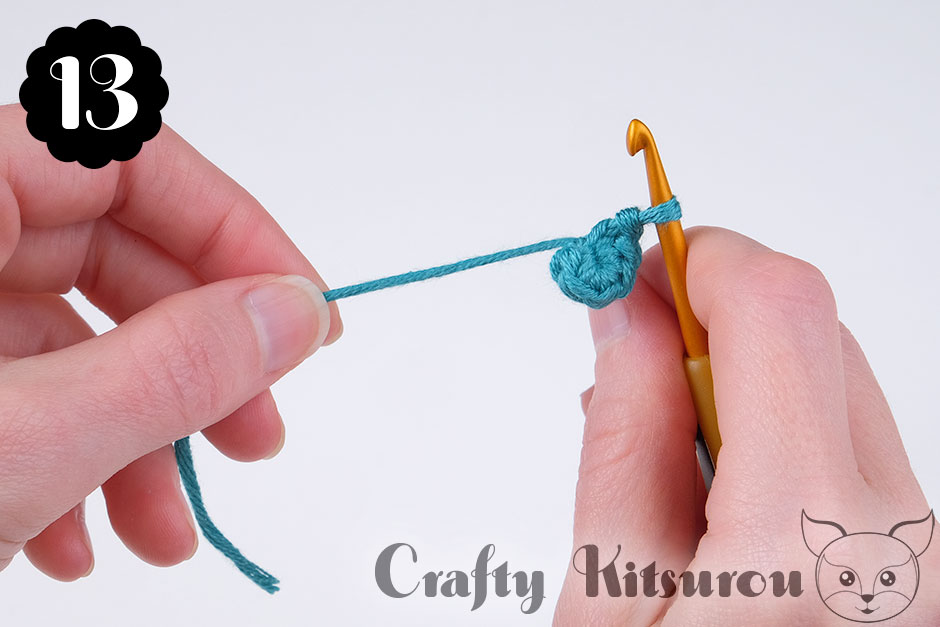 13. Completed ring!
If you are working in a continuous spiral, sc into the first stitch you made in round 1. If you are working in joined rounds, slip stitch in first sc of round 1 to join.
How to keep the hole closed.
Depending on the type of yarn you are using, the hole may widen as you continue to crochet. I find this is more likely to happen with slippery yarns made from materials such as acrylic, nylon, or silk. Here are 3 ways to keep the hole closed:
1. If you will not see the backside of the project, after you have completed the second round, pull yarn tail tight. Using a yarn needle, tie off yarn through the backside of a stitch. This technique is great for amigurumi. Once you have tied the knot, you just leave the yarn tail inside.
2. If you will see the backside of the finished project, weave the yarn tail in as soon as you have enough rounds completed to do so. You may need to tighten the hole again before weaving by pulling on the yarn tail.
3. You can crochet over the yarn tail while crocheting round 2. Note: I do not like this technique for amigurumi because it will increase the stitch height of round 2. This may be fine for something like a hat, but it can change the shape noticeably of something delicate like an animal’s nose.
~~~*~~~ ~~~*~~~ ~~~*~~~ ~~~*~~~ ~~~*~~~ ~~~*~~~ ~~~*~~~ ~~~*~~~
17 responses to “Crochet a Magic Ring”
If you would please add to this tutorial the weaving in technique you use. Your magic ring instruction is the most easiest I have found yet. It’s totally understandable. But then you talk about the weaving in but don’t completely explain. I would love to see your technique on weaving in. Thanx so much for your tutorial. Sincerely , alex h.
Any standard weaving technique should work. The type and weight of yarn I use can change the way I weave it in. Generally speaking, I use a yarn needle to sew through 1-3 stitches in one direction, I then sew through 1-3 different stitches in a different direction. I will sew horizontally and vertically through stitches. I just make it up as I go along, being sure not to make my weaving noticeable.
I have followed many tutorials and yours is a lifesaver! Thank you!
You’re very welcome!
Hi! I have a question that’s a bit beyond the initial magic ring. I’m working in the round and the pattern calls for increasing in the next few rounds. Is there a way to really tighten up the holes/gaps that are left due to the increase? I hope that makes sense LOL
There is no way that I know of to tighten those holes. The reason the hole is so big, is because you’re fitting two sc into the space of one, and that extra yarn is stretching the top of the stitch below. Your best bet would be to do an invisible increase, which will result in a smaller hole. To do an invisible increase, you crochet the first stitch into the front loop only, and the second stitch into both loops (the normal way). I hope that helps!😀
Great tutorial!! Question; when you chain 1 into the magic ring, does that count as the first stitch? My pattern calls for 8 hdc in ring, but when I do that, I always end up with an extra stitch (in this case, 9 stitches instead of 8).
Thanks for any help you can give me. 🙂
Your comment is awaiting moderation.
Great tutorial!! Question; when you chain 1 into the magic ring, does that count as the first stitch? My pattern calls for 8 hdc in ring, but when I do that, I always end up with an extra stitch (in this case, 9 stitches instead of 8).
Thanks for any help you can give me. 🙂
Catherine
Great tutorial!! Question; when you chain 1 into the magic ring, does that count as the first stitch? My pattern calls for 8 hdc in ring, but when I do that, I always end up with an extra stitch (in this case, 9 stitches instead of 8). Am I supposed to count the “V’s” or the hdc stitches?
Thanks for any help you can give me. 🙂
Catherine
Hello! The chain 1 is not a stitch. For HDC, you can either:
1) After the chain 1, immediately start crocheting 8 HDC stitches.
—OR—
2) After the chain 1, ch 1 again. You now have chained 2 and this counts as your first HDC. Crochet 7 HDC into ring.
I prefer the look of option 1.
You want to count HDCs, not Vs because you might accidentally count chains which aren’t supposed to count as stitches. The easiest way to do this is to use a stitch marker. As soon as you finish making your first HDC, place the stitch marker in that stitch’s V. If you are going with option 2 and using a ch 2 as the first HDC, place the stitch marker in the 2nd ch. When you complete the round, you’ll then be able to tell which V is a stitch and which one(s) are not.
I hope that helps!
Thank you Thank you thank you! I am new to crochet and been trying for forever to master this. videos, pictures etc etc no luck, all seemed to fail me and I was ready to give up learning to crochet. Thank you for making it simple and easy to follow
Rnd 8(folding rnd) what does folding round mean
Hello. I have a similar problem to Catherine only I have one stitch LESS than the pattern calls for. The pattern states: sc 6 into the magic ring. If I do not count the 1st chain stitch, after I do 6 sc there are only 5 “V” stitches. Stitch #6 is still on the hook. What am I doing / counting wrong?
I can either do another sc to bring the total Vs up to 6 (showing on the loop) or I can count the first chain stitch as stitch #1. Another thing I can do is connect sc #1 (not the chain stitch) to stitch 6 with a slip stitch which takes loop #6 off the hook and I have 6 stitches.
Comments? Suggestions are much appreciated!
It’s hard for me to tell exactly what you are doing without seeing a picture, but I’ll try my best.😀 The chain st becomes part of the first sc, but is not a complete stitch. In fact, that ch will become the V on the top of the first sc. I recommend putting a stitch marker in the first sc immediately after you stitch it. That means putting in a stitch marker after you complete step 10. Then continue to sc 5 more times into the ring.
Your sc magic ring tutorial is amazing. I agree with Bri above: it is by far, the easiest. Now, do you have a similar tutorial for a dc magic ring? 🤞🏻🤞🏻🤞🏻🤞🏻
To dc in a magic ring, refer to step 6. After completing step 6, ch 2 more times, you have now made 3 chains and this will count as your first dc stitch. Then stitch dc stitches into the ring instead of sc. Hope that helps!
I have a pattern that calls for 2 sc and then 2 dc in magic ring, and I’m having a hard time visualizing how to do both single and double crochet and can’t find a tutorial that does both, only one or the other