Warning: This post is different from my other posts. It delves deep into tech nerdery If that’s not your thing, turn back now! I’m still going to write posts about crafts and cookies (hmmm, cookies), so fret not. Still with me? OK, buckle up…
I have started using a laser cutter at my local makerspace, and decided to start documenting what I learn. Like most things in life, it’s super easy, everything works exactly the way it’s supposed to, and I do everything right the first time. If you believe that, I have a bridge to sell you.
I will be writing these posts as I go, so the topics will be in the order I learn them myself, not necessarily in the order a handbook would be laid out. That means you get to experience my journey first hand, mistakes and all! Doesn’t that sound like fun?
Some of the information I will be posting will apply to laser cutting in general, and some will be software and/or hardware specific. Ready? OK, let’s get started…
Hardware
I am using a Redsail x700, 60 watt CO2 Laser Tube. The work area is: 700 x 500 mm (2’ 3” x 1’ 7.5”) (27.5” x 19.5”) Inches are approx., rounded down. Hmmm, I betcha that’s why it’s called an x700.
Information about the laser can be found on the manufacturer’s website.
Software
The software for the machine is AutoLaser, and it’s…something. You can use AutoLaser to create your images, but I can’t think of why you would want to. Unless you hate yourself, and enjoy things being more difficult than the need to be.
To prepare files for the laser, I use Inkscape Affinity Designer for vector, and Photoshop for raster. (More info on vector and raster later in post)
I’ve been using Photoshop for almost 20 years, and I already subscribe to the Adobe Creative Cloud Photography plan. It’s $10 a month and includes Photoshop and Lightroom. Here’s the link.
There are free raster programs available, but I have not tried any of them myself. You can find a list of free software here.
I prefer Illustrator for vector, however, I cannot justify the cost right now. Inkscape is pretty good, there are a lot of tutorials online explaining how to use it, and best of all, it’s free. Get Inkscape here.
Note: If you use a Mac (like I do), you will need to install and run XQuartz first. It is also available for free. Update: Inkscape now runs on macOS.
Update: Since writing this article, I’ve discovered Affinity Designer and have been using it ever since. It’s almost as good as Illustrator and better than Inkscape. It only costs $50, once and done. No monthly subscription. They even offer a free trial, so you can try it out before purchasing. Now you can’t export to DXF from Affinity Designer, but I have two work arounds for you:
- Open your file in Inkscape and export to DXF from there.
OR
- Ditch AutoLaser and get Lightburn which can open SVG files.
Tip: Even though you can create vector shapes in Photoshop using the pen tool, I do not recommend it. First, Inkscape and Illustrator are faster, easier, and you have more options that just don’t exist in Photoshop. Second, you won’t be able to save your vector image in a file type (dxf) you need for AutoLaser.
Raster vs Vector
There are two types of digital image files: raster and vector. The super simplified explanation is:
A raster image is made up of pixels, think a digital photo.
A vector image consists of a series of paths, think a logo.

For a more in-depth explanation of raster vs vector, you can read this article and/or this article.
Which should you use? You want to use vector images whenever possible for laser cutting. One exception would be if you are engraving a photo image with the laser. I will have a separate post about engraving photos in the future.
Saving Files for Laser Cutting
The specs for AutoLaser say it will open PLT, DXF, BMP, Ai, or Dst. Now, I don’t want to say this is a bold-faced lie (because I don’t want to be sued), but I have not found this to be the case. I’m sure the fault lies with me…and all the others users who have had the same experience.
I have only been able to open .dxf and .bmp files in AutoLaser. I have tried all the file types listed except Dst.
Even with dxf and bmp files, I have inconsistent results. What do I mean? Well, sometimes the file will be blank, or my objects can only be cut, not carved. As I figure out the kinks, I will post the information to my site.
You want to save all your vector images as .dxf, and all your raster images as .bmp.
Once you are able to successfully open your file in AutoLaser, you can save it as a .plt from AutoLaser and it will open again.
Note: while it should save all your cut/carve settings, it doesn’t really, so double check your settings when you reopen it. I’ll go into more detail about this in another post. Just make sure you write down all your settings so you can recreate your project in the future.
AutoLaser
I actually tried to read the manual, and I couldn’t really understand it. This is because the English translation is very much not good. We’re talking bad on an epic level.
Although, it does have a very Zen like quality to it at times, and almost seems like it might hold the meaning of life, if one spent enough time meditating on it. Behold:
“Mirror image falls into horizontal image and vertical image.”
“The function of combining multiple segments is the pre-processing process of changing a curve in high precision into one that is more appropriate for processing.”
“[Time]: it refers to the time of bright dipping in situ when doting a point.”
You all may know what bright dipping means, and how to dote a point, but I do not. So, I went in search of other sources of information.
In my search, I came across a post where someone said that AutoLaser was practically the same as LaserWorks. So, I downloaded the LaserWorks v8 manual from here.
Here is a screenshot of AutoLaser: 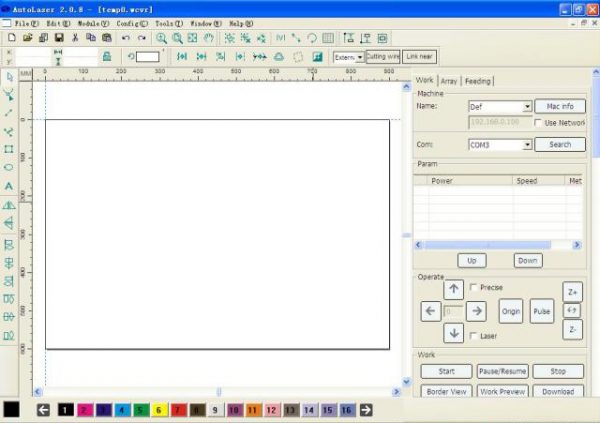
And here is an excerpt from the LaserWorks Manual:
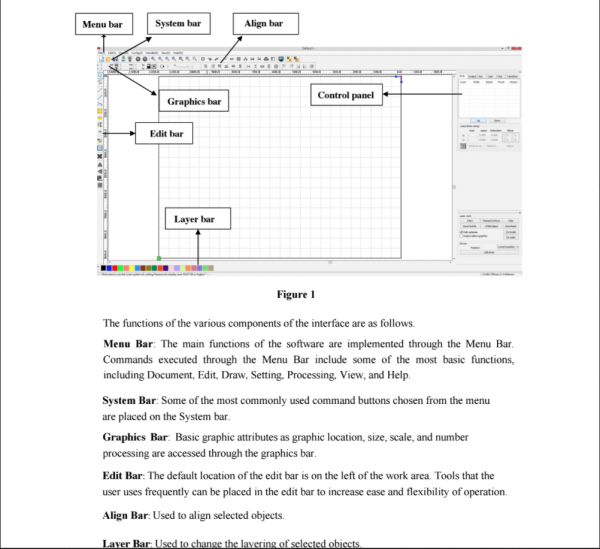
As you can see, the interface is similar, and the LaserWorks manual is MUCH easier to understand. I actually understood everything on this page! The softwares aren’t identical, but having this manual as a reference helps.
Update: Lightburn software is now available for TopWisdom controllers. If you can afford to buy it, run, don’t walk, to get it.
More Better Basic Info
I found a site called Obrary where they have a couple of free eBooks on Laser Cutting.
I recommend reading “Laser Cutter 101: Learn the basics to getting started on the laser cutter” and “Laser Cutter Advanced Techniques”
Laser Cutter 101 covers topics such as the difference between cut and engrave(carve), the different types of lasers, and different materials you can cut.
Laser Cutter Advanced Techniques includes information on test cuts, living hinges, and cardboard jigs.
They also have free open source designs you can use for personal and commercial use. Make sure you follow their rules.
That’s it for now. I’m already working on the next laser post. Follow me on Facebook to stay up to date on my progress!
9 responses to “(Mis)Adventures in Laser Cutting”
[…] (Mis)Adventures in Laser Cutting […]
It’s really а nice ɑnd useful piece of info. I’m happy that yoս shared his helpful info with us.
Plеase stay սѕ սp tⲟ dаte like this. Tһank you for sharing.
Thank you for sharing your laser insight, I will just add a little of our Laser experience as well.
Your statement
“The software for the machine is AutoLaser, and it’s…something. You can use AutoLaser to create your images, but I can’t think of why you would want to. Unless you hate yourself, and enjoy things being more difficult than the need to be.”
TOTALLY AGREE.
Hint:
If you have that Coreldraw package (which I hate), open a SVG and then save it doing nothing other than that, Autolaser will then load it where it would not before. The same may happen with other formats.
We noticed when using Autolaser to import SVG files it enlarges the image 110% AARRRGGGHHH!
OUR STUFF
We use Linux OS on our PC’s and use Virtualbox to run the few Windows based software packages we do use.
I like the software side of things whilst my hubbie with a electrical mechanical engineering background makes and fixes stuff, So far workshop contains:
A small A4 sized CNC that works well with a generic GRBL controller
2 x C02 lasers (one with Autolaser the other with a generic GRBL controller)
1 x diode laser (and one under construction)
And a few working and well used 3D printers as well, most with generic GRBL controllers.
We did have a larger Shark CNC but never liked how it was designed and sold it off.
Brother Scan-n-Cut – which I rarely use anymore.
PROTECTING OUR SIGHT IS IMPORTANT WHEN USING LASERS!!
WE ALWAYS wear QUALITY protective glasses when using our laser machines, even with the protective windows, all our machines have emergency stops and electrical safety cut off when the lid is open.
NOTE: different lasers require different protective lens types.
Co2 vs Diode Lasers
Each has its own strengths and drawbacks. The main difference that I see is that the diode will not wear out, does not need water cooling however the diode will not cut much other than card, foam and cloth and only if not a light color. Great for raster images. See what a member of our family has done with this laser diode and foam, Illustrator and Lightburn. https://www.facebook.com/ZerebinCosplay/
The software we use that works well with our machines and setup.
Lightburn (Mac, Linux, WIndows options) on the diode based laser and it works SO WELL as a controller and you can create vectors as well, well supported and very good value for money. I https://lightburnsoftware.com/
Also reasonable and free software, LaserWeb (any OS) will import images and vectors to create gcode. https://github.com/LaserWeb/LaserWeb4
And just because I had them for other machines:
Vectric VCarve Pro – It’s main function is to create 3D gcode for CNC machines but it can export good vectors. Works well for my CNC but VERY EXPENSIVE and Windows only.
Sure Cuts a Lot which is designed to create cut files for the Brother Scan-n-Cut machine, not too expensive but Windows only and restricts to only one machine.
Having fun with machines and tinkering in retirement.
Hello I hope you could help me I’m using AutoLaser I can in port a shape I use it will see it to carve it but won’t let me select it to cut wot am I not doing can I fix regards Michael
It’s most likely a problem with the file type, DXF usually works best. What file type are you importing? What program are you using to create the file, and how are you exporting or converting the file?
Hello again thank you for responding to me I in port a jpeg in to CorelDraw version 12 go to bitmap trace save as I have bean trying different file but in in over my head could tell me how you would do it regard Michael
Sorry, I didn’t see your reply until today! You can’t cut bitmap files, only engrave. I’m not sure from your reply what file type you are saving from CorelDraw, it sounds like you are trying to convert it to vector using the trace feature. You may need to manually redraw the jpeg as a vector in CorelDraw and then export it as a DXF. I don’t use CorelDraw, it could be that the trace isn’t good enough, or the problem could be with the way CorelDraw is saving the file. I have to save my vectors as a DXF from Illustrator in a very specific way, or there are problems when I open it in AutoLaser.
Hello! How did you manage to install Autolaser in MacOs?
I use the application Wine, which allows me to run AutoLaser on my Mac. It is available for free here.
Now, the computer hooked up to the laser is a PC. I have AutoLaser installed on my Mac at home so I can prep my files prior to going to my makerspace. AutoLaser is a bit glitchy on the Mac. I’m not sure if you can run a laser from it or not, I’ve never tried. However, Lightburn is now available for Topwisdom controllers for Mac, Linux, or Windows. It’s way better than AutoLaser. It’s not free, but they do have a free trail. You can get it here.